
100 AI Video Camera & Movement short prompt को cinematic बनाने के लिए Commands सीखें। इस guide में /pushin, /dollyin, /zoomIn, /trackingShot, /droneShot, /orbit, /slowMotion, /bulletTime, /dollyZoom, /hyperlapse, /cameraShake, /masterShot जैसे commands को आसान Hindi में explain किया गया है। इन short codes की मदद से आप AI video prompts में smooth camera movement, cinematic angles, tracking shots, zoom effects, aerial views, transitions और professional camera effects आसानी से describe कर सकते हैं। 88 Creative FX Short Codes:
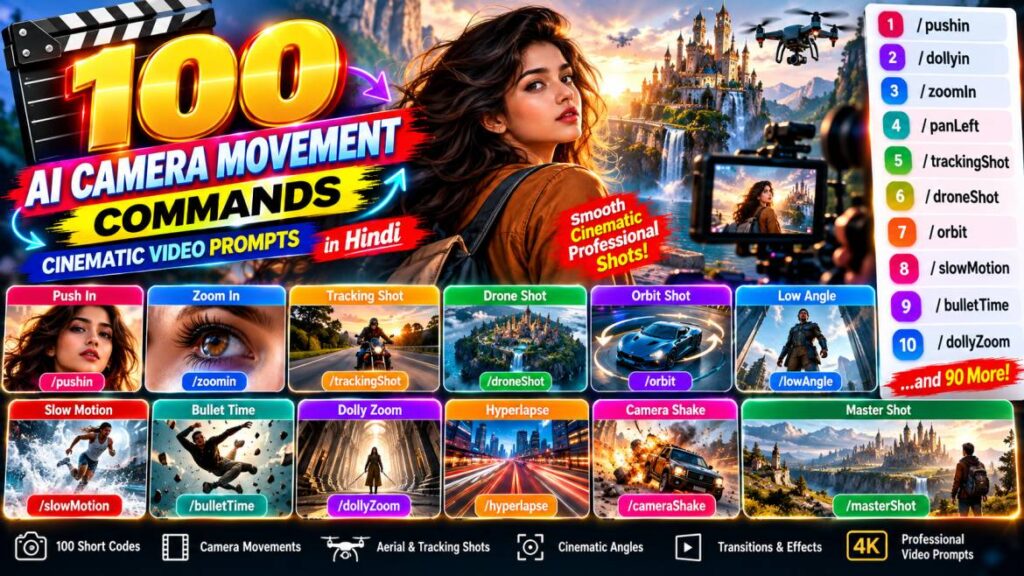
100 AI Camera & Movement Short Prompt | Professional Cinematic Video Prompts
1. /pushin — कैमरा धीरे-धीरे Subject की ओर लाना
यह command camera को धीरे-धीरे subject की तरफ आगे बढ़ाने के लिए है। इससे character, product या scene पर viewer का ध्यान धीरे-धीरे केंद्रित होता है और cinematic reveal जैसा effect मिलता है।
2. /pullout — कैमरा Subject से पीछे हटाना
इस command में camera subject से धीरे-धीरे पीछे जाता है। इससे शुरुआत में दिखाई दे रहे character या object के आसपास का पूरा environment reveal किया जा सकता है।
3. /dollyin — Smooth Camera Forward Movement
/dollyin camera को physically subject की तरफ smooth तरीके से move करने का निर्देश देता है। इसका इस्तेमाल dramatic entry, emotional moment और cinematic close-in shot के लिए किया जा सकता है।
4. /dollyout — Smooth Camera Backward Movement
यह camera को subject से पीछे की ओर smoothly move करता है। इससे scene का scale और surrounding environment धीरे-धीरे दिखाई देने लगता है।
5. /zoomin — Zoom करके Subject को पास दिखाना
यह command lens zoom के माध्यम से subject को visually बड़ा दिखाने के लिए है। दूर से किसी object या character की detail पर ध्यान केंद्रित करने के लिए उपयोगी है।
6. /zoomOut — Zoom करके Scene को Wider करना
इस command से camera lens zoom-out करता है और ज्यादा environment frame में दिखाई देता है। बड़े location reveal या establishing visual में इसका उपयोग किया जा सकता है।
7. /panLeft — Camera को Left Pan करना
यह command camera को horizontally बाईं तरफ घुमाने के लिए है। इससे scene के left side में मौजूद object या environment को smoothly reveal किया जा सकता है।
8. /panRight — Camera को Right Pan करना
इसमें camera horizontally दाईं तरफ move या rotate करता है। Wide environment, landscape और moving subject को follow करने के लिए यह उपयोगी है।
9. /tiltUp — Camera को ऊपर Tilt करना
यह command camera को नीचे से ऊपर की दिशा में tilt करने के लिए है। Tall building, character reveal, sky या किसी बड़े object की height दिखाने में इसका उपयोग किया जा सकता है।
10. /tiltDown — Camera को नीचे Tilt करना
इस command में camera ऊपर से नीचे की ओर tilt करता है। किसी object के ऊपर से नीचे तक reveal या ground-level detail दिखाने में यह उपयोगी है।
11. /truckLeft — Camera को Left Side Move करना
यह camera को बिना subject की ओर बढ़े horizontally left side में move करने का निर्देश देता है। इससे side-moving cinematic shot बनाया जा सकता है।
12. /truckRight — Camera को Right Side Move करना
यह command camera को horizontally right direction में move करती है। Moving subject के साथ parallel cinematic movement बनाने में इसका उपयोग किया जा सकता है।
13. /crabLeft — Left Direction में Side Movement
यह camera को sideways left direction में smoothly move करने के लिए है। इससे scene में lateral cinematic motion पैदा होता है।
14. /crabRight — Right Direction में Side Movement
यह /crabLeft का opposite है। Camera subject के relation को बनाए रखते हुए right side में smoothly move करता है।
15. /arcLeft — Subject के चारों ओर Left Arc
यह command camera को subject के आसपास curved/arc path में left direction में move करने के लिए है। इससे subject के चारों ओर cinematic perspective बदलता रहता है।
16. /arcRight — Subject के चारों ओर Right Arc
इसमें camera subject के चारों ओर right-side curved movement करता है। Product showcase और character reveal में यह काफी cinematic दिखाई दे सकता है।
17. /orbit — Subject के चारों ओर घूमता Camera
यह command camera को subject के चारों ओर orbit करने के लिए है। Character, car, product या किसी central object को 360-degree style cinematic तरीके से दिखाया जा सकता है।
18. /360orbit — Full 360° Camera Orbit
यह camera को subject के चारों ओर complete 360-degree movement देने के लिए है। इसका उपयोग dramatic character reveal, product showcase और cinematic action visuals में किया जा सकता है।
19. /cineOrbit — Cinematic Orbit Shot
यह सामान्य orbit को ज्यादा cinematic presentation देता है। Camera smooth movement, controlled framing और dramatic perspective के साथ subject के चारों ओर घूमता है।
20. /slowPushin — Slow Cinematic Push-In
यह camera को बहुत धीरे और smoothly subject की ओर लाने के लिए है। Emotional scenes, suspense और dramatic facial expressions में यह प्रभावी हो सकता है।
100 AI Camera Movement Short Codes & Commands | Cinematic Video Prompt Guide
21. /slowPullout — Slow Cinematic Pull-Out
इसमें camera धीरे-धीरे subject से पीछे जाता है। इससे character के आसपास की location और atmosphere धीरे-धीरे reveal होती है।
22. /fastZoom — Fast Zoom Effect
यह command बहुत तेज zoom-in या zoom-out effect के लिए है। Action scenes, transitions और energetic cinematic moments में इसका उपयोग किया जा सकता है।
23. /smoothZoom — Smooth Cinematic Zoom
यह controlled और smooth zoom movement बनाने के लिए है। अचानक movement के बजाय धीरे-धीरे subject को बड़ा या छोटा दिखाया जाता है।
24. /rackFocus — Focus को एक Subject से दूसरे पर बदलना
यह command focus को foreground subject से background subject या दूसरे object पर smoothly shift करने के लिए है। इससे cinematic storytelling और visual attention control किया जा सकता है।
25. /focusPull — Cinematic Focus Pull
यह एक focused subject से दूसरे subject पर focus transfer करने के लिए है। खासकर dialogue scenes और foreground-background storytelling में इसका उपयोग होता है।
🎬 Tracking & Follow Camera Commands
26. /followShot — Subject को Follow करना
यह command camera को moving subject के साथ follow करने के लिए है। Character, animal, vehicle या किसी moving object को लगातार frame में बनाए रखने के लिए उपयोगी है।
27. /trackingShot — Moving Subject Tracking
इसमें camera subject की movement को track करता है। Running character, moving car या walking person को cinematic तरीके से follow किया जा सकता है।
28. /leadShot — Subject के आगे Camera
यह command camera को moving subject के आगे रखते हुए movement capture करने के लिए है। Character camera की ओर बढ़ता हुआ दिखाई दे सकता है और background पीछे move करता है।
29. /sideTracking — Side से Tracking
यह camera को subject के side में parallel चलाकर movement record करने के लिए है। Running, cycling और vehicle shots में यह खास तौर पर उपयोगी है।
30. /reverseTracking — Reverse Direction Tracking
इस command में camera subject की movement के opposite direction में पीछे जाते हुए उसे frame करता है। इससे subject लगातार camera की तरफ बढ़ता हुआ cinematic दिखाई दे सकता है।
31. /handheld — Realistic Handheld Camera
यह command camera में natural handheld movement जोड़ती है। इससे footage ज्यादा realistic, documentary-style या raw cinematic महसूस हो सकती है।
32. /steadicam — Smooth Stabilized Movement
यह command बहुत smooth walking-camera movement बनाने के लिए है। Camera operator के चलने के बावजूद footage relatively stable और professional दिखाई देती है।
33. /gimbalMove — Gimbal जैसी Smooth Movement
यह command stabilized gimbal-camera movement simulate करती है। Walking shots, product videos और cinematic tracking में smooth motion प्राप्त किया जा सकता है।
34. /droneShot — Drone Camera Shot
यह command aerial/drone-style camera perspective बनाने के लिए है। Landscape, buildings, roads, mountains और large environments को ऊपर से cinematic तरीके से दिखाया जा सकता है।
35. /droneReveal — Drone से Reveal Shot
इसमें drone-style camera movement धीरे-धीरे scene या subject को reveal करता है। किसी location, building, vehicle या landscape को dramatic तरीके से introduce करने के लिए उपयोगी है।
36. /aerialView — Aerial Camera View
यह command scene को ऊपर से aerial perspective में दिखाती है। बड़े शहर, जंगल, roads, mountains या crowd जैसे environments के लिए यह अच्छा shot है।
37. /topDown — सीधे ऊपर से View
इसमें camera बिल्कुल ऊपर से नीचे की तरफ scene को देखता है। Objects की arrangement, roads, food, products या characters की positioning स्पष्ट दिखाई जा सकती है।
38. /birdEyeView — Bird’s-Eye Perspective
यह command बहुत ऊंचे angle से नीचे की तरफ देखने वाला perspective देती है। बड़े landscape या complex scene की overall layout दिखाने के लिए इसका उपयोग किया जा सकता है।
39. /highAngle — High-Angle Shot
इस command में camera subject के ऊपर से नीचे की तरफ देखता है। इससे subject comparatively छोटा दिखाई दे सकता है और environment ज्यादा visible होता है।
40. /lowAngle — Low-Angle Shot
यह camera को subject के नीचे रखकर ऊपर की ओर देखने वाला perspective बनाता है। Character, building या vehicle को powerful और imposing visual appearance देने के लिए उपयोगी है।
41. /overheadShot — Overhead Camera Shot
यह scene को ऊपर से देखने के लिए है, लेकिन जरूरी नहीं कि बिल्कुल straight-down हो। Food, table arrangement, action choreography और environment shots में इसका उपयोग किया जा सकता है।
42. /underShot — नीचे से ऊपर का Shot
इस command में camera subject के नीचे से ऊपर की ओर capture करता है। Tall subjects और dramatic architectural visuals में इससे strong perspective मिलता है।
43. /fpvShot — FPV Camera Perspective
यह First-Person-View drone/camera जैसा fast immersive perspective देता है। तेज उड़ान, racing, action और dynamic environment shots के लिए उपयोगी है।
44. /subjectFollow — Subject को Continuously Follow करना
यह command camera को मुख्य subject की movement के अनुसार लगातार adjust करने के लिए है। इससे subject frame से बाहर जाने की संभावना कम होती है।
45. /faceTrack — Face Tracking
यह command camera focus और framing को subject के face के साथ maintain करने के लिए है। Talking-head, cinematic portrait और moving character shots में उपयोगी है।
46. /objectTrack — Object Tracking
यह किसी specific object को camera द्वारा लगातार track करने के लिए है। Product, ball, car या किसी moving object को center of attention बनाए रखा जा सकता है।
47. /carFollow — Car को Follow करना
यह camera को moving car के साथ follow करने वाला cinematic shot बनाने के लिए है। Road sequences और automotive videos में इसका उपयोग किया जा सकता है।
48. /bikeFollow — Bike को Follow करना
यह command moving motorcycle या bicycle के साथ camera tracking करने के लिए है। Fast road scenes और adventure sequences में उपयोगी है।
49. /walkWith — Character के साथ Walking Camera
इस command में camera character के साथ-साथ चलता है। Walking scene को natural और immersive cinematic appearance देने के लिए यह अच्छा विकल्प है।
50. /runWith — Running Subject के साथ Camera
यह command camera को running character या subject के साथ move करने के लिए है। इससे energetic और action-oriented tracking shot बनाया जा सकता है।
🎥 Cinematic Framing & Shot Types
51. /cinematicMove — Cinematic Camera Movement
यह command scene में professional cinematic camera movement जोड़ने के लिए है। इसमें smooth motion, controlled framing और storytelling-oriented camera behavior शामिल किया जा सकता है।
52. /establishingShot — Location Establishing Shot
यह command शुरुआत में पूरी location या environment को establish करने के लिए है। Film या video की शुरुआत में शहर, घर, जंगल, mountains आदि दिखाने के लिए उपयोगी है।
53. /wideShot — Wide Scene
यह command subject के साथ ज्यादा environment को frame में शामिल करती है। Landscape, group scene और location storytelling के लिए यह उपयोगी है।
54. /mediumShot — Medium Framing
इसमें subject को medium distance से दिखाया जाता है। Character के upper body और surrounding environment दोनों को balanced तरीके से दिखाने के लिए इसका उपयोग किया जा सकता है।
55. /closeUp — Close-Up Shot
यह command subject के चेहरे या किसी महत्वपूर्ण object को करीब से दिखाती है। Emotion, facial expression और important details पर ध्यान केंद्रित करने के लिए उपयोगी है।
56. /extremeCloseUp — Extreme Close-Up
इसमें subject के बहुत छोटे detail को frame में बड़ा करके दिखाया जाता है। आंख, हाथ, product detail, texture या किसी छोटे object को highlight करने के लिए उपयोगी है।
57. /longShot — Long Shot
यह subject को relatively दूर से दिखाता है और environment को भी पर्याप्त space देता है। Character और location दोनों को एक साथ establish करने के लिए अच्छा है।
58. /overTheShoulder — Shoulder के ऊपर से Shot
इस command में camera एक व्यक्ति के shoulder के पीछे से दूसरे subject को दिखाता है। Conversation, interaction और storytelling scenes में यह बहुत उपयोगी framing है।
59. /pointOfView — POV Perspective
यह command viewer को ऐसा perspective देती है जैसे camera स्वयं character की आंखों या viewpoint से scene देख रहा हो। First-person storytelling और immersive videos के लिए उपयोगी है।
60. /firstPerson — First-Person Camera
इसमें camera character की नजर से scene दिखाता है। Walking, driving, gaming-style और immersive experiences में इसका उपयोग किया जा सकता है।
61. /thirdPerson — Third-Person Perspective
यह subject को बाहर से follow करने वाला perspective है। Character की पूरी movement और environment को एक साथ दिखाने के लिए उपयोगी है।
62. /carMount — Car-Mounted Camera
यह camera को car पर mounted दिखाने के लिए है। Driving shots, road videos और automotive cinematic scenes में इसका उपयोग किया जा सकता है।
63. /hoodMount — Car Hood Camera
इस command में camera car के hood पर mounted होता है। इससे driving direction और road का immersive front view बनाया जा सकता है।
64. /roofMount — Vehicle Roof Camera
यह camera को vehicle की roof पर mounted perspective में रखता है। इससे vehicle movement और surrounding environment का unique cinematic angle मिलता है।
65. /sideMount — Vehicle Side-Mounted Camera
यह command camera को vehicle के side पर mount करके side perspective दिखाने के लिए है। Moving car या bike के साथ road और environment को dynamic तरीके से दिखाया जा सकता है।
66. /gimbalLow — Low Gimbal Shot
यह command low-height पर stabilized gimbal movement देती है। Running feet, vehicles और ground-level action को cinematic तरीके से capture करने के लिए उपयोगी है।
67. /gimbalHigh — High Gimbal Shot
इसमें camera relatively high position पर stabilized movement करता है। Environment और subject दोनों को smooth तरीके से दिखाने के लिए इसका उपयोग किया जा सकता है।
68. /whipPan — तेज Whip Pan
यह command camera को बहुत तेज़ी से एक direction में pan करने वाला effect देती है। इसका उपयोग energetic transitions और action sequences में किया जा सकता है।
69. /spinShot — Camera Spin
इस command में camera subject के आसपास या axis के अनुसार spinning movement करता है। Music videos, action shots और creative transitions में यह प्रभावी हो सकता है।
70. /zoomSpin — Zoom + Spin Combination
यह command zoom movement और camera rotation को combine करती है। इससे highly dynamic और stylized transition या action visual बनाया जा सकता है।
71. /dutchAngle — Tilted Cinematic Angle
इसमें camera horizon को जानबूझकर tilt करता है। Suspense, tension, psychological scenes या unusual cinematic composition बनाने के लिए उपयोगी है।
72. /levelShot — Straight & Balanced Shot
यह command camera को level horizon और balanced perspective के साथ रखती है। Clean, natural और professional-looking footage के लिए यह useful है।
73. /parallaxMove — Parallax Camera Movement
यह command foreground और background elements के बीच relative movement create करती है। इससे static scene में depth और 3D-like cinematic feeling आ सकती है।
74. /revealShot — Hidden Scene Reveal
यह command camera movement के माध्यम से किसी छिपे हुए subject या location को धीरे-धीरे reveal करती है। Storytelling और surprise reveal के लिए बहुत उपयोगी है।
75. /inealShot — Image में दिए गए नाम का Shot
Image में इस command को /inealShot लिखा हुआ दिखाई दे रहा है। यह संभवतः source image में typo या custom short code हो सकता है, इसलिए इसका exact intended meaning image से निश्चित रूप से निर्धारित नहीं किया जा सकता। यदि इसे अपने prompt system में इस्तेमाल करना है, तो इसके लिए desired camera action स्पष्ट रूप से लिखना बेहतर रहेगा।
76. /timelapseMove — Time-Lapse Camera Movement
यह command time-lapse style में camera movement दिखाने के लिए है। बादलों, शहर, construction, sunset या किसी लंबे समय में बदलते scene को dynamic तरीके से दिखाया जा सकता है।
77. /hyperlapse — Fast Moving Time-Lapse
यह command तेज़ camera movement के साथ hyperlapse effect बनाने के लिए है। City streets, roads, buildings और long-distance movement को energetic तरीके से प्रस्तुत किया जा सकता है।
78. /slowMotion — Slow-Motion Action
यह command action को slow motion में दिखाने के लिए है। Water splash, running, jumping, falling या dramatic movement को detail के साथ दिखाया जा सकता है।
79. /speedRamp — Fast और Slow Motion का Transition
यह command एक ही shot में speed को fast से slow या slow से fast करने के लिए है। Action videos और dramatic transitions में इससे dynamic visual rhythm बनाई जा सकती है।
80. /bulletTime — Bullet-Time Camera Effect
यह command subject के आसपास camera movement को इस तरह प्रस्तुत करने के लिए है कि action moment लगभग frozen दिखाई दे और camera subject के चारों ओर move करे। इसका उपयोग stylized action sequences में किया जा सकता है।
🚁 Advanced Camera Movement
81. /craneShot — Crane Camera Movement
यह command camera को vertically ऊपर या नीचे crane-style movement देने के लिए है। बड़े scene reveal और cinematic establishing shots में इसका उपयोग किया जा सकता है।
82. /jibShot — Jib Camera Movement
यह crane के समान controlled upward/downward camera movement बनाने के लिए है। Scene transition और dramatic reveal में यह smooth cinematic effect देता है।
83. /dollyZoom — Dolly Zoom Effect
यह command camera की movement और lens zoom को opposite directions में combine करने वाला dramatic effect है। इससे subject relatively स्थिर रहते हुए background का perspective unusual तरीके से बदलता दिखाई दे सकता है।
84. /vertigoEffect — Vertigo-Style Perspective
यह command dramatic perspective distortion बनाने के लिए है। इसका उपयोग suspense, psychological tension या visually unusual cinematic moment बनाने में किया जा सकता है।
85. /flyThrough — Scene के अंदर से Flying Camera
यह command camera को environment के अंदर तेजी या smoothly उड़ते हुए आगे ले जाने के लिए है। Buildings, tunnels, forests, fantasy worlds और futuristic environments में इसका उपयोग किया जा सकता है।
86. /flyOver — Scene के ऊपर से Fly करना
इसमें camera landscape या location के ऊपर से उड़ते हुए आगे बढ़ता है। Mountains, cities, roads और large environments के cinematic aerial sequences के लिए उपयोगी है।
87. /flyAround — Subject के चारों ओर Flying Camera
यह command camera को subject के आसपास flying movement देने के लिए है। Car, building, character या fantasy object को dramatic aerial orbit में दिखाया जा सकता है।
88. /tiltShift — Tilt-Shift Miniature Effect
यह command scene में selective focus और miniature-like appearance बनाने के लिए है। इससे वास्तविक city या environment छोटा miniature model जैसा दिखाई दे सकता है।
89. /motionBlur — Speed Motion Blur
यह command movement के दौरान motion blur जोड़ती है। Fast-moving vehicles, running subjects और rapid camera movement को ज्यादा dynamic बनाने के लिए उपयोगी है।
90. /staticToMove — Static से Moving Camera
यह command shot की शुरुआत स्थिर camera से करके धीरे-धीरे movement शुरू करने के लिए है। इससे video की शुरुआत controlled रहती है और बाद में cinematic motion पैदा होता है।
91. /revealFromBehind — पीछे से Subject Reveal
यह command किसी object, wall, tree, person या foreground element के पीछे से subject को reveal करने के लिए है। इससे scene में anticipation और cinematic storytelling बढ़ती है।
92. /peekAround — Corner से Peek Shot
इस command में camera किसी corner, wall या object के पीछे से धीरे-धीरे peek करता हुआ scene reveal करता है। Suspense और discovery scenes में यह बहुत उपयोगी है।
93. /slideTransition — Sliding Camera Transition
यह command एक scene से दूसरे scene में sliding movement वाली transition बनाने के लिए है। Social media videos और cinematic edits में smooth scene changes के लिए उपयोगी है।
94. /smoothTransition — Smooth Scene Transition
यह command दो shots या scenes के बीच seamless और smooth transition बनाने के लिए है। इससे video में abrupt cut के बजाय flowing cinematic movement महसूस हो सकता है।
95. /matchMove — Motion Match करना
यह command नए shot या object की movement को previous shot की movement के साथ match करने के लिए है। इससे अलग-अलग scenes के बीच continuity और seamless visual connection बनाया जा सकता है।
96. /sceneRotation — Scene Rotation
यह command camera या scene perspective को rotate करने के लिए है। इसका इस्तेमाल creative transitions, spinning environments और stylized cinematic shots में किया जा सकता है।
97. /cameraShake — Cinematic Camera Shake
यह command controlled camera shake जोड़ने के लिए है। Explosion, impact, earthquake, crash या intense action scene में movement का visual impact बढ़ाया जा सकता है।
98. /microMove — Subtle Camera Movement
यह command बहुत हल्की और subtle camera movement के लिए है। Static image को completely motionless रखने के बजाय हल्का cinematic motion देकर ज्यादा natural video feel बनाई जा सकती है।
99. /cinemaFrame — Cinematic Framing
यह command scene को cinematic framing और composition देने के लिए है। Subject placement, visual balance, depth और film-style presentation को बेहतर बनाने के लिए इसका उपयोग किया जा सकता है।
100. /masterShot — Complete Master Cinematic Shot
यह command पूरे scene को एक comprehensive master shot की तरह capture करने के लिए है। इसमें मुख्य subject, environment और scene की overall action को एक ही wide cinematic composition में दिखाया जा सकता है।
🎯 Quick Formula: इन Commands को AI Video Prompt में कैसे लगाएँ?
आप किसी भी command को अपने subject और scene के साथ combine कर सकते हैं:
/dollyin + subject + location + action + lighting + cinematic style
उदाहरण:
/dollyin— A realistic black horse walking slowly through a misty mountain road, cinematic morning light, natural movement, realistic environment, 4K film look.
या multiple commands:
/trackingShot + /slowMotion + /lowAngle— A powerful eagle flying over a mountain valley, camera tracking the eagle from a low angle, wings moving naturally, dramatic clouds, cinematic lighting, realistic 4K video.
Tip: एक prompt में 2–4 camera commands को logically combine करने से movement ज्यादा clearly define किया जा सकता है; बहुत सारे conflicting camera directions एक साथ देने से AI video model को movement समझने में परेशानी हो सकती है।
- Legal Advocate Draft
- Hindi Trading Ebook
- 50+ किसानो के लिए खेती
- AI 4 EBooks Mega Bundle
- ALL Excel formula
- 1500+ ai shortcut prompt
- Mobile Reparing
AI वीडियो कैमरा मूवमेंट कमांड, AI वीडियो प्रॉम्प्ट कैमरा कमांड, सिनेमैटिक कैमरा मूवमेंट, AI वीडियो बनाने के प्रॉम्प्ट कैमरा शॉर्ट कोड, AI वीडियो सिनेमैटिक प्रॉम्प्ट, AI वीडियो के लिए कैमरा एंगल, AI वीडियो कैमरा इफेक्ट सिनेमैटिक वीडियो प्रॉम्प्ट हिंदी