
99 AI Camera & Movement Commands की इस complete guide में आप cinematic video बनाने के लिए powerful camera commands सीखेंगे। /cinematic, /droneview, /dollyin, /tracking, /slowmotion, /lowangle, /orbit, /goldenhour, /bokeh, /motionblur, /rackfocus, /tealorange और कई अन्य commands को easy Hindi + English में explain किया गया है।
इन commands की मदद से आप camera movement, camera angles, cinematic lighting, motion, composition, focus, depth, camera effects, color grading और portrait shots को अपने AI video prompts में बेहतर तरीके से control कर सकते हैं। AI Bundle
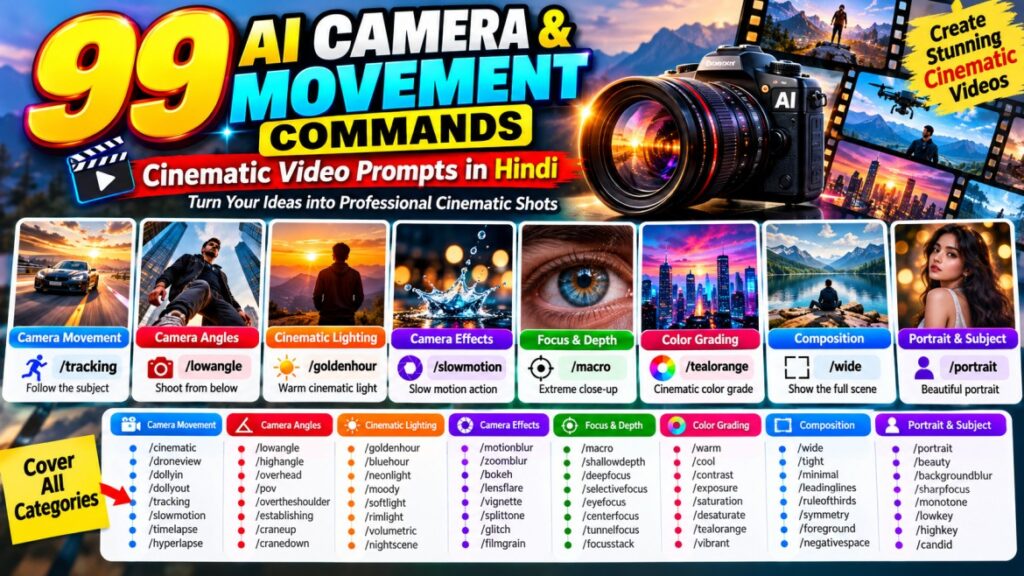
🎥 AI Camera Movement Commands और Movement Controls
1. /cinematic — Cinematic Shot बनाना
यह command किसी scene को cinematic movie shot जैसा बनाने के लिए इस्तेमाल होती है। इसमें professional camera composition, dramatic framing, cinematic lighting, depth और फिल्म जैसी visual quality शामिल की जा सकती है। यह सामान्य scene को ज्यादा polished और storytelling-oriented बनाने में मदद करती है।
2. /droneview — Aerial Drone View
इस command से camera को आसमान से देखने वाले drone perspective में रखा जाता है। Mountains, cities, roads, buildings, landscapes और large environments को ऊपर से दिखाने के लिए इसका उपयोग किया जा सकता है।
3. /closeup — Close-Up Shot
यह command camera को subject के बहुत करीब लाकर उसके चेहरे या किसी खास detail को prominently दिखाती है। Eyes, facial expression, product details और emotional moments को highlight करने के लिए यह बहुत उपयोगी है।
4. /wideangle — Wide-Angle Shot
इस command से camera wide field of view capture करता है ताकि scene का ज्यादा हिस्सा दिखाई दे। Landscapes, large rooms, city scenes और dramatic environments को establish करने के लिए इसका उपयोग किया जा सकता है।
5. /orbit — Subject के चारों ओर Camera घूमाना
यह command camera को subject के चारों तरफ smoothly घूमने वाला movement देती है। इससे subject को अलग-अलग angles से दिखाया जा सकता है और cinematic 360-degree जैसा camera movement बनाया जा सकता है।
6. /dollyin — Camera को Subject की ओर लाना
इस command में camera धीरे-धीरे subject की तरफ move करता है। इसका उपयोग किसी character के चेहरे, emotion या important object पर धीरे-धीरे viewer का ध्यान केंद्रित करने के लिए किया जाता है।
7. /dollyout — Camera को पीछे ले जाना
यह command camera को subject से धीरे-धीरे दूर ले जाती है। इससे शुरुआत में close subject दिखाई देता है और फिर पूरा environment reveal होने लगता है।
8. /tracking — Moving Subject को Follow करना
इस command से camera moving subject के साथ-साथ चलता है। Running person, moving car, cyclist, animal या किसी action scene में subject को frame के अंदर maintain करने के लिए इसका उपयोग किया जा सकता है।
9. /slowmotion — Slow Motion Action
यह command action को dramatic slow-motion appearance देती है। Water splash, running, jumping, falling, sports या किसी dramatic movement को cinematic तरीके से दिखाने में यह उपयोगी है।
10. /timelapse — Time-Lapse Effect
इस command से लंबे समय में होने वाली गतिविधियों को तेजी से दिखाया जाता है। जैसे sunset, sunrise, traffic, clouds movement, construction या city activity को short cinematic sequence में दिखाना।
11. /hyperlapse — Fast Cinematic Camera Movement
यह command तेज और dynamic camera movement वाला hyperlapse effect बनाने के लिए है। City roads, buildings, travel scenes और moving environments में energetic visual sequence बनाया जा सकता है।
🎥 Advanced Camera Angles — Advanced Camera Perspectives
12. /lowangle — नीचे से Camera Angle
इस command में camera subject के नीचे से ऊपर की ओर देखता है। इससे character, building या object visually powerful और imposing दिखाई दे सकता है। इसका उपयोग dramatic storytelling और heroic shots में किया जा सकता है।
13. /highangle — ऊपर से Camera Angle
यह command camera को subject के ऊपर रखकर नीचे की तरफ देखने वाला perspective देती है। इससे scene में अलग visual perspective बनाया जा सकता है और environment ज्यादा दिखाई दे सकता है।
14. /overhead — बिल्कुल ऊपर से Top View
इस command में camera subject के ठीक ऊपर रखा जाता है और scene को लगभग straight-down view में दिखाया जाता है। Food photography, roads, people arrangement, vehicles और creative compositions में इसका उपयोग किया जा सकता है।
15. /pov — First-Person Point of View
POV command scene को character की आंखों से देखने जैसा perspective देती है। यानी viewer ऐसा महसूस करता है जैसे वह स्वयं उस scene में मौजूद है। Walking, cycling, driving और immersive storytelling में यह उपयोगी है।
16. /overtheshoulder — Over-the-Shoulder Shot
इस command में camera किसी character के shoulder के पीछे से scene को capture करता है। दो characters की conversation, reaction shots और cinematic storytelling में यह बहुत common composition है।
17. /establishing — Establishing Shot
यह command scene की शुरुआत में location और environment को establish करने वाला wide cinematic shot बनाने के लिए उपयोगी है। इसमें building, city, village, mountain या पूरा landscape दिखाकर viewer को location का context दिया जा सकता है।
18. /rackfocus — Focus को एक Subject से दूसरे पर Shift करना
इस command से camera focus धीरे-धीरे एक subject से दूसरे subject पर shift करता है। उदाहरण के लिए foreground में व्यक्ति और background में दूसरा व्यक्ति हो तो focus पहले व्यक्ति से दूसरे व्यक्ति पर smoothly transfer किया जा सकता है।
19. /handheld — Handheld Camera Movement
इस command से camera में natural handheld movement का effect बनाया जाता है। इसमें हल्की camera shake और organic movement हो सकती है, जिससे scene documentary या realistic camera recording जैसा महसूस हो सकता है।
20. /steadycam — Smooth Walking Camera Movement
यह command camera को smoothly moving और stabilized walking shot जैसा movement देती है। Character के पीछे चलते हुए camera movement या corridor/travel sequence में इसका उपयोग किया जा सकता है।
21. /craneup — Camera को ऊपर उठाना
इस command में camera ground-level से ऊपर की ओर उठता है। इससे धीरे-धीरे बड़ा environment reveal किया जा सकता है और cinematic establishing shot बनाया जा सकता है।
22. /cranedown — Camera को नीचे लाना
यह command camera को ऊपर की position से धीरे-धीरे नीचे लाने के लिए है। इससे किसी building, city या landscape से subject की ओर cinematic transition बनाया जा सकता है।
🏃 Motion & Action Commands — Movement और Action
23. /running — Running Motion
यह command character या subject को natural running movement देने के लिए इस्तेमाल होती है। Body movement, legs, arms और camera tracking को realistic रखने की instruction के साथ dynamic action scene बनाया जा सकता है।
24. /walking — Natural Walking Movement
इस command से character को natural walking motion दिया जाता है। Walking speed, body movement और camera follow को realistic रखकर cinematic walking sequence बनाया जा सकता है।
25. /turnaround — Subject Rotation
यह command subject या vehicle को smoothly rotate करने के लिए इस्तेमाल होती है। Product showcase, character reveal और vehicle presentation में subject को अलग-अलग angles से दिखाया जा सकता है।
26. /reveal — Cinematic Reveal
इस command का उपयोग subject या scene को धीरे-धीरे reveal करने के लिए किया जाता है। Camera movement, foreground obstruction या changing composition के जरिए viewer को मुख्य subject का dramatic introduction दिया जा सकता है।
27. /entrance — Cinematic Character Entrance
इस command से character की dramatic entry create की जाती है। Character किसी door, building, smoke, light या dark environment से cinematic तरीके से scene में enter कर सकता है।
28. /exit — Dramatic Scene Exit
यह command character या vehicle को scene से cinematic तरीके से बाहर जाते हुए दिखाने के लिए है। Camera पीछे रह सकता है या subject को follow करते हुए exit movement दिखा सकता है।
29. /freeze — Action Freeze Effect
यह command action के एक dramatic moment को freeze-frame जैसा दिखाने के लिए उपयोग की जाती है। Jumping, falling, sports, explosion या flying objects जैसे scenes में powerful still moment बनाया जा सकता है।
30. /speedramp — Fast और Slow Motion Transition
इस command से video में fast और slow motion के बीच dynamic transition बनाया जाता है। Action scenes, cars, sports और cinematic reels में इसका उपयोग काफी प्रभावशाली हो सकता है।
31. /bullettime — Bullet-Time Camera Effect
यह command action को एक ऐसे cinematic perspective में दिखाने के लिए है जिसमें subject की movement को freeze या slow करते हुए camera उसके आसपास move करता हुआ महसूस होता है। यह dramatic action sequences में उपयोगी है।
32. /floating — Floating Effect
इस command से character या object को हवा में floating या suspended दिखाई देने वाला effect दिया जाता है। Fantasy, dream sequence और surreal cinematic scenes में इसका उपयोग किया जा सकता है।
33. /falling — Falling Action
यह command character या object को गिरते हुए दिखाने के लिए इस्तेमाल होती है। Vertical movement, body posture और surrounding environment को match करके dramatic falling sequence बनाया जा सकता है।
💡 Cinematic Lighting Commands — Cinematic Lighting
34. /goldenhour — Golden Hour Lighting
यह command scene में warm golden sunlight जोड़ती है। Sunset या sunrise के आसपास की soft, warm और cinematic lighting बनाकर landscape और portrait दोनों को attractive बनाया जा सकता है।
35. /bluehour — Blue Hour Lighting
इस command से sunset के बाद या sunrise से पहले वाली cool blue atmospheric lighting बनाई जाती है। City, landscape और outdoor cinematic scenes में यह शांत और cinematic mood दे सकती है।
36. /neonlight — Neon Cinematic Lighting
यह command scene में colorful neon lights add करने के लिए है। Blue, pink, purple, red और cyan जैसी neon lighting का उपयोग करके cyberpunk, nightlife या modern cinematic environment बनाया जा सकता है।
37. /moody — Dark Moody Lighting
इस command से scene को dark, dramatic और atmospheric lighting दी जाती है। Deep shadows, limited highlights और low-key illumination के माध्यम से mysterious cinematic mood बनाया जा सकता है।
38. /softlight — Soft Diffused Lighting
यह command harsh shadows को कम करके soft और diffused studio lighting create करती है। Portraits, beauty shots, products और interviews के लिए यह clean और flattering lighting दे सकती है।
39. /rimlight — Rim Lighting
इस command से subject के किनारों पर पीछे से light आती हुई दिखाई जाती है। इससे character का outline background से अलग दिखाई देता है और subject को cinematic depth मिलती है।
40. /silhouette — Silhouette Lighting
इस command से subject को dark silhouette में दिखाया जाता है और पीछे bright light या sunset रखा जाता है। Character की पहचान से ज्यादा उसकी shape और outline पर focus किया जाता है।
41. /spotlight — Focused Spotlight
इस command से subject पर concentrated light डाली जाती है जबकि बाकी environment comparatively dark रखा जा सकता है। Stage performance, dramatic reveal और cinematic portraits में यह effect उपयोगी है।
42. /volumetric — Cinematic Light Rays
यह command environment में visible light rays या volumetric beams जोड़ती है। जैसे खिड़की से आती sunlight, forest में light rays या smoky room में cinematic beams।
43. /backlight — Backlighting
इस command में मुख्य light source subject के पीछे रखा जाता है। इससे subject के आसपास bright outline, glowing edges या dramatic backlit appearance बनाई जा सकती है।
44. /nightscene — Cinematic Night Scene
यह command scene को realistic रात के environment में बदलने के लिए उपयोगी है। Moonlight, street lights, dark sky, cool shadows और atmospheric night lighting जोड़कर cinematic nighttime appearance बनाया जा सकता है।
Composition & Framing Commands — Composition और Framing
45. /wide — Wide Composition
इस command से scene का ज्यादा से ज्यादा हिस्सा frame में शामिल किया जाता है। Landscape, architecture और large environment को context सहित दिखाने के लिए इसका उपयोग किया जाता है।
46. /tight — Tight Framing
यह command subject को frame में ज्यादा बड़ा और close दिखाने के लिए उपयोगी है। इसका उद्देश्य unnecessary background को कम करके viewer का पूरा ध्यान मुख्य subject पर रखना है।
47. /minimal — Minimal Composition
इस command से clean और simple composition बनाई जाती है। कम objects, ज्यादा empty space और clear subject के माध्यम से elegant तथा uncluttered visual तैयार किया जाता है।
48. /leadinglines — Leading Lines
इस command में road, railway track, architecture, walls या किसी natural line को इस तरह compose किया जाता है कि viewer की नजर automatically मुख्य subject की ओर जाए।
49. /ruleofthirds — Rule of Thirds
इस command से subject को frame के center में रखने के बजाय सामान्यतः thirds grid के महत्वपूर्ण intersection points के आसपास place किया जाता है। इससे composition balanced और visually engaging हो सकती है।
50. /symmetry — Symmetrical Composition
यह command image में left और right या ऊपर और नीचे visual balance बनाने के लिए इस्तेमाल होती है। Buildings, architecture, roads, reflections और structured scenes में symmetry विशेष रूप से प्रभावशाली होती है।
51. /foreground — Foreground Depth
इस command से scene के foreground में कोई visual element शामिल किया जाता है। इससे foreground, middle ground और background के बीच depth बढ़ती है और shot अधिक three-dimensional महसूस होता है।
52. /framewithinframe — Frame के अंदर दूसरा Frame
इस command में natural या architectural elements जैसे doors, windows, arches, branches आदि का उपयोग करके subject को एक दूसरे frame के अंदर compose किया जाता है। इससे viewer का ध्यान subject पर केंद्रित होता है।
53. /diagonal — Diagonal Composition
इस command से subject या scene में diagonal lines और angles का उपयोग किया जाता है। इससे static image की तुलना में ज्यादा dynamic और energetic composition बनाई जा सकती है।
54. /centered — Center Composition
इस command में मुख्य subject को frame के बिल्कुल center में रखा जाता है। इसका उपयोग symmetrical scenes, portraits, product shots और powerful direct compositions में किया जा सकता है।
55. /negativespace — Negative Space
इस command से subject के आसपास पर्याप्त खाली space रखा जाता है। यह minimalist photography, advertising, poster design और dramatic compositions में subject को ज्यादा prominent बनाने में मदद करता है।
Camera Effects Commands — Cinematic Camera Effects
56. /motionblur — Motion Blur
यह command fast movement का visual impression देने के लिए motion blur add करती है। Moving cars, running characters और fast camera movement में इसका उपयोग speed और energy दिखाने के लिए किया जा सकता है।
57. /zoomblur — Zoom Blur
इस command से image में center की ओर या center से बाहर जाती हुई zoom-like blur बनाई जाती है। इससे dramatic speed और movement का visual effect पैदा किया जा सकता है।
58. /bokeh — Background Bokeh
यह command background में soft circular light blur create करती है। Subject को foreground में अलग दिखाने और cinematic photography जैसा appearance देने के लिए इसका उपयोग किया जाता है।
59. /lensflare — Cinematic Lens Flare
इस command से bright light source के कारण camera lens पर दिखाई देने वाला flare effect add किया जाता है। Sunlight और strong artificial lights के साथ इसका उपयोग cinematic visual बनाने में किया जा सकता है।
60. /vignette — Edge Darkening
इस command से image के किनारों को थोड़ा dark किया जाता है जबकि center comparatively brighter रहता है। इससे viewer का ध्यान image के मुख्य subject की ओर आकर्षित किया जा सकता है।
61. /splittone — Split Tone Color Grading
इस command में shadows और highlights को अलग-अलग color tones दिए जाते हैं। उदाहरण के लिए shadows को blue और highlights को warm orange देकर stylized cinematic color treatment बनाया जा सकता है।
62. /monochrome — Black & White Look
यह command scene को monochrome यानी black-and-white appearance में बदलती है। Color हटाकर lighting, contrast, texture और composition पर अधिक visual focus बनाया जा सकता है।
63. /radialblur — Radial Blur
इस command से image में radial direction में blur effect बनाया जाता है। Center से बाहर की ओर movement या spinning जैसा dynamic visual impression create किया जा सकता है।
64. /prism — Prism Light Effect
इस command से glass prism से गुजरती light जैसी colorful refraction effect बनाई जाती है। Rainbow-like light streaks और chromatic highlights जोड़कर artistic cinematic appearance बनाया जा सकता है।
65. /glitch — Digital Glitch Effect
यह command image या video में digital distortion और glitch effect जोड़ती है। RGB separation, digital lines और distorted visual elements के माध्यम से modern cyber/digital aesthetic बनाया जा सकता है।
66. /filmgrain — Film Grain Effect
इस command से image में subtle grain texture add किया जाता है ताकि digital footage पुराने film camera जैसा महसूस हो। Vintage और cinematic aesthetics में इसका उपयोग किया जा सकता है।
🔍 Focus & Depth Commands — Focus और Depth
67. /macro — Extreme Close-Up
यह command किसी छोटी चीज या detail को बहुत करीब से दिखाने के लिए उपयोग की जाती है। फूल, आंख, insect, jewelry, product details और textures को अत्यधिक detail में दिखाने के लिए यह useful है।
68. /shallowdepth — Shallow Depth of Field
इस command में मुख्य subject sharp रहता है और background काफी blur हो जाता है। Portrait और cinematic photography में इससे subject-background separation मजबूत होती है।
69. /deepfocus — Deep Focus
इस command से foreground और background दोनों को comparatively sharp रखने की कोशिश की जाती है। Landscape, architecture और scenes जहां कई layers महत्वपूर्ण हों, वहां इसका उपयोग किया जा सकता है।
70. /selectivefocus — Selective Focus
इस command में scene के किसी specific subject को sharp रखा जाता है और बाकी elements को blur किया जाता है। इसका मुख्य उद्देश्य viewer का ध्यान केवल चुने हुए subject पर रखना है।
71. /eyefocus — Eyes पर Focus
यह command portrait में आंखों को सबसे sharp और prominent detail बनाने के लिए इस्तेमाल की जाती है। Facial expressions और emotional portraits में eyes को focal point बनाया जा सकता है।
72. /centerfocus — Center Focus
इस command से frame के center में मौजूद subject या detail को sharp रखा जाता है और आसपास के हिस्से को softly blur किया जा सकता है। इससे viewer का attention naturally center की तरफ जाता है।
73. /tunnelfocus — Tunnel Focus Effect
यह command surrounding elements को इस तरह blur या arrange करती है कि वे tunnel जैसा visual pathway बनाते हुए viewer की नजर को central subject तक ले जाएं।
74. /focusstack — Multiple Focus Points
इस command का उद्देश्य अलग-अलग focus points को combine करके अधिक हिस्से को sharp दिखाना है। Macro photography और detailed objects में foreground से background तक ज्यादा detail retain करने के लिए यह concept उपयोगी है।
75. /dropfocus — Droplet पर Focus
यह command किसी specific water droplet या tiny detail को primary focal point बनाने के लिए उपयोगी है। Water drops, splash photography और macro scenes में dramatic close-up बनाया जा सकता है।
76. /manualfocus — Precise Manual Focus
इस command से AI को यह निर्देश दिया जाता है कि focus को automatic तरीके से बदलने के बजाय किसी specific subject या area पर precisely रखा जाए। इससे composition में desired focal point को control किया जा सकता है।
77. /bokehshape — Bokeh का Shape बदलना
यह command background bokeh lights को अलग-अलग shapes में दिखाने के लिए उपयोगी है। उदाहरण के लिए circular lights के बजाय heart, star या अन्य creative shapes का effect बनाया जा सकता है।
🎨 Color Grading Commands — Colors और Mood
78. /warm — Warm Color Tone
यह command image में warm tones जैसे yellow, orange और golden shades को बढ़ाती है। इससे scene cozy, welcoming और warm atmosphere वाला दिखाई दे सकता है।
79. /cool — Cool Color Tone
इस command से blue और cyan जैसे cool colors को बढ़ाकर शांत और cool visual mood बनाया जाता है। Night scenes, winter landscapes और calm environments में इसका उपयोग किया जा सकता है।
80. /contrast — Contrast बढ़ाना
यह command highlights और shadows के बीच difference को बढ़ाने के लिए इस्तेमाल होती है। इससे image ज्यादा bold और defined दिखाई दे सकती है, लेकिन excessive contrast से details खो सकती हैं।
81. /exposure — Exposure Adjust करना
इस command से image की overall brightness और exposure level को adjust किया जाता है। Dark photo को brighter या overly bright image को comparatively balanced बनाया जा सकता है।
82. /saturation — Color Vibrancy बढ़ाना
यह command colors की intensity बढ़ाने या कम करने के लिए इस्तेमाल की जाती है। Saturation बढ़ाने से colors ज्यादा vivid दिखाई देते हैं, जबकि moderate adjustment से image ज्यादा balanced रखी जा सकती है।
83. /desaturate — Colors को Muted करना
इस command से image के colors की intensity कम की जाती है। इससे soft, muted, faded या understated visual appearance बनाया जा सकता है।
84. /cinematic — Cinematic Color Grade
यह command image में cinematic color treatment लागू करने के लिए है। Contrast, highlights, shadows और color palette को movie-style appearance के अनुसार balance किया जा सकता है।
85. /tealorange — Teal & Orange Grade
यह command shadows/background में teal और highlights/skin tones में orange या warm tones का combination बनाने के लिए उपयोग की जाती है। इससे popular cinematic color grading appearance मिल सकती है।
86. /vibrant — Vibrant Colors
इस command से image के colors को ज्यादा bright और energetic बनाया जाता है। Travel photos, food, fashion, nature और social media visuals में vibrant look उपयोगी हो सकता है।
87. /bw — Black & White
यह command image को black-and-white में convert करने के लिए उपयोग की जाती है। Color हटाकर composition, texture, contrast और lighting को ज्यादा prominent बनाया जा सकता है।
88. /neon — Neon Color Grading
इस command से image में neon-inspired color grading लागू की जाती है। Purple, pink, cyan और blue जैसे bright colors का उपयोग करके futuristic या nightlife-inspired look बनाया जा सकता है।
👤 Portrait & Subject Commands — Portrait और Subject
89. /portrait — Professional Portrait
यह command subject को professional portrait photography style में दिखाने के लिए उपयोगी है। Proper framing, lighting, background separation और facial focus के माध्यम से polished portrait बनाया जा सकता है।
90. /beauty — Beauty Enhancement
इस command से portrait में natural beauty और skin tones को enhance करने का प्रयास किया जाता है। Lighting, skin appearance, facial clarity और subtle retouching के जरिए polished beauty portrait बनाया जा सकता है।
91. /rimlight — Subject के चारों ओर Rim Light
यह command subject के पीछे से आने वाली light के माध्यम से उसके edges पर glowing outline बनाती है। Dark background में subject को अलग दिखाने के लिए यह cinematic technique बहुत उपयोगी है।
92. /backgroundblur — Background Blur
इस command से subject को sharp रखते हुए पीछे के background को blur किया जाता है। इससे distractions कम होते हैं और viewer का attention मुख्य subject पर केंद्रित होता है।
93. /sharpfocus — Subject को Sharp रखना
यह command मुख्य subject की edges और details को clear और sharp रखने के लिए इस्तेमाल की जाती है। Portrait, product और action photography में subject clarity बढ़ाने के लिए इसका उपयोग किया जा सकता है।
94. /monotone — Monotone Portrait
इस command से portrait को एक limited single-tone color treatment दिया जाता है। Black-and-white या एक dominant color के साथ artistic और sophisticated portrait appearance बनाई जा सकती है।
95. /lowkey — Dark Low-Key Effect
यह command portrait में dark environment, deep shadows और limited highlights create करती है। इससे mysterious और dramatic low-key photography style बनाया जा सकता है।
96. /highkey — Bright High-Key Effect
यह low-key के विपरीत bright और evenly lit visual style है। White या light background, soft shadows और high brightness के साथ clean तथा airy portrait बनाया जा सकता है।
97. /closeup — Detailed Close-Up Portrait
यह command subject के चेहरे या किसी specific detail का close-up shot बनाने के लिए उपयोगी है। Eyes, facial expression, skin texture या अन्य important detail को frame में prominently दिखाया जा सकता है।
98. /fullbody — Full Body Shot
यह command subject को head से लेकर feet तक पूरा frame में दिखाने के लिए इस्तेमाल होती है। Fashion photography, character presentation, outfit showcase और full-body portraits के लिए उपयोगी है।
99. /candid — Natural Candid Moment
यह command subject को posed photograph की बजाय natural और spontaneous moment में दिखाने के लिए उपयोग की जाती है। Subject को camera की तरफ सीधे pose करने के बजाय natural activity या genuine expression में दिखाया जा सकता है।
अगर आप भी AI Video बनाना या सीखना चाहते हो, तो मैंने आपके लिए एक Ebook Pdf Step by Step AI Video के बारे में बताया है, जो लोग इस Ebook को खरीदना चाहते है, तो इस लिंक पर क्लिक करे Buy Now